Radon Be Gone…

On October 27, 2011, in news, by jake
0

By now, you likely have heard of Radon…an odorless colorless gas that causes cancer. But, exactly what is it, and more importantly, how can we get rid of it?

Radon is a gas that is caused by the natural breakdown of uranium in the soil. It appears to be located in areas of high granite content most often. As it happens Iowa is one of the higher reading locations, due to the glacial activities that exposed the Canadian Shield bedrock formation and tumbled the rock down to the plains of the Mid West US. Radon can also be found in higher readings across Ohio and Pennsylvania, glacial activity is likely the cause here as well, due to the proximity to the Canadian Shield, but the rich mining veins also contain Radium and Uranium which is released when the ore that contains them is broken down to smaller size. Radon is measured in Pico-Curies per liter of air, similar to the more popular PPM (parts per million). Guidelines state that nothing need be done if the level is under 4 pico curies, but it certainly couldn’t hurt to mitigate even that little amount.

The ill effects of Radon are caused not by the gas itself, but the by products of its decay. These particles are small enough to be inhaled and lodge themselves in the body and continue to decay, all the while releasing radioactive isotopes that can harm the vital cell structures of the lungs. While cancer is certainly the one we all hear about, the breakdown of cellular tissue is likely causing other health problems.

Enough doom and gloom…what can be done about this? Radon is everywhere in small doses, the ground is constantly releasing it to the atmosphere, but in such dilution that it poses little to no threat. With our homes however, we have taken a large area of dirt and covered it with a slab of concrete which traps the Radon trying to vent out of the dirt; now we have a build up of higher levels that still want to off gas, so they rise up into the houses…

Ideally, we would stop the Radon from rising up by sealing the bottom of the house with a vapor barrier and/or by de-pressurizing the area beneath the slab. What we hope to accomplish in doing that is to not allow the Radon into the house, but rather collect it and disperse it up into the atmosphere. Let’s go over some popular methods to do this:

  • Sealing – If you have a crawlspace you can cover the earth floor with a non permeable vapor barrier, this could be considered enough in certain areas or depending on your Radon level. If this is not possible, or if you have a Basement, begin by sealing the cracks and joints, and even where utilities and other services enter the home.
  • Sub Slab Depressurization – This consists of having an active fan pulling air from under the slab (or vapor barrier) through a piping system and releasing it into the atmosphere. This is probably the most common way Radon is eliminated, and really the only way to go if you have elevated readings. Typically, there is a hole drilled through the slab down into the gravel bed; a connection made to the perimeter drainage system; or a perforated pipe in laid under the vapor barrier. This is then connected to a fan mounted to some PVC pipe, which is run up above the eaves of the roof to discharge the effluent air.
  • A less common way of battling Radon if the alternate methods aren’t achievable is to run positive pressure in the house. This is as simple as it sounds, there is a fan pulling air in from outside which creates an envelope of air pressure that keeps the Radon from flowing in.This Is Not the preferred way of doing this, and in todays tightly built homes, probably not a good idea in any case. It is far preferable to remove the Radon from the general area than to swat it away as it were.

Fan sizes – There are many fans you cam purchase for Radon Mitigation, which one you need can only be determined correctly on site. If we have enough cohesive information a recommendation can be made, but you will need to have some specifics regarding your property. The whole idea of sub slab depressurization is not to purchase the highest CFM you can (like you would for a kitchen) but enough to lower the pressure under the slab to allow the Radon to be evacuated. In fact, too much can be a bad thing, with too much fan you run the risk of actually elevating your Radon level by bringing more to you.


Water, Under Pressure…

On October 12, 2011, in news, by jake
0

Domestic water supply to our homes tops out at around 60 PSI. So, that’s a lot, right?

What we forget is that the more automated our lives have become, the more auxiliary devices we have to take care of us. Such as sprinkler systems, dishwashers, clothes washers, well you get the idea… The downside to that is the water pressure can only do so much before things start to not be what they should. There are few things worse than having to take a shower in water that barely comes out of the showerhead.

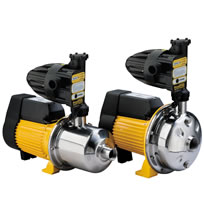
The best way to maintain pressure to the house is with a Davey BT Pressure Boosting Pump. What these pumps do is sense the amount of water being drawn into the house and begin pressurizing the water supply to keep all those fixtures pouring as they should. They can provide a set amount of water at a set pressure increase indefinitely, so that new Rain Forest showerhead or whatever they are calling it today will in fact provide enough rain to cause you to believe you are on an Amazon trek.

Davey pumps are installed near the water supply line to the house, so are out of the way…and better yet, they operate all on their own. Once installed, the Torrium module operates the pump as necessary to keep the pressure even. There is no maintenance, adjustments or otherwise to this pump, you install it and let it work for you.

Caveat – Please consult us to get the right one for you, you cannot get the most powerful one simply because of the impressive performance numbers, it must be sized properly to the system it is going on. We are more than happy to discuss this with you. We always would like to spend the time necessary than sell you something inappropriate.


Kitchen Make-Up Air…

On October 12, 2011, in news, by jake
0

It is now time to discuss the elephant in the room when it comes to kitchen ventilation…make up air. In elementary terms, it is as simple as “what goes out, must come in”.

With the trend of Commercial style ranges and other high output cooking devices, folks are having very large ventilation systems installed to evacuate the grease laden steam particles given off during cooking. While 1200 CFM for a kitchen fan sure sounds awe inspiring, and some ranges actually need this amount of flow…the reality is that as homes get tighter and more insulated, we are having a harder time getting air to feed this voracious fan. Years back, engineers could count on a fair bit of in-flow through gaps and other openings provided by lesser building standards that allowed make up air for not only the kitchen, but bath fans and clothes dryer as well. While this works, it is not ideal as during the winter you may be pulling in very cold air that begins to condensate in the wall and brings the possibility of mold growth.  Therefore, if it can’t come in cleanly from outside, it will come down the chimney or worse, through the exhaust vents of gas fired appliances (water heater and the like). This situation is called Backdrafting and is quite dangerous as it can bring noxious combustion exhaust back into the house. We want to avoid this at all costs!

Recent code changes to certain areas (and with more to come) are calling for Make Up Air when the kitchen range fan exceeds 300-400 cfm. For most residential uses, this is fine. However, when we start getting up to the higher end of Exhaust Fans, Make Up Air should be in your Mechanical Ventilation Plans. There are several ways to accomplish this, and as many options depending on where you live and your expected comfort level…

LEED is of the idea that air should not be evacuated to the outside, thereby keeping the envelope in tact. They assert that a recirculating type system should be utilized that filters the air with the use of activated carbon. The reality here is that these fans are typically noisy and ineffective so they are unused and the grease ends up on cabinets and other surfaces. It is our belief that the air should be evacuated fully out of the structure to maintain good indoor air quality. In reality, the kitchen fan is used for short periods of time only once or twice a day, so the overall loss of conditioned air is quite small. LEED also prefers to see a fan with a maximum of 200-250 cfm (which is nice as it eliminates any need for make up air, and for a well built home in the passivhaus style is probably sufficient).

Now then, what can we do about all this to get air to the kitchen hood? Restaurants actually provide filtered make up air at the hood and range location to allow for massive amounts to be cycled as they have quite a heat and steam/grease load to contend with. It is a great way to go, but the hoods are quite bulky and are not especially pleasing to the eye, unless gleaming monoliths of stainless steel float your boat. Some folks hope their HRV can provide the difference…sadly, no it can’t. HRVs are made for balanced load conditions where they take and replace the same amount of air. We do have one unit that can over-pressurize if necessary, but it cannot come close to supplying what a large kitchen fan will require. Of course, if you live in California or other temperate zone, an open window can provide all the air you need at a minimum of cost.

For the rest of us…mechanical make up air must be provided, and here are some ideas:

Adequate – You can have an opening to the outside that is operated manually or via motor, and preheated if you live in colder climes. Whilst it would be desirable to filter this incoming air, the static losses across the filter may make it operate at a lesser level than anticipated.

Better – Having a powered opening to the outside, with booster fan of equal power to the range fan, and a heater for the incoming air (if necessary), and a filter box to clean the air. This would provide the air the fan needed, tempered with warm air to lessen the shock of cold incoming air.

Best – A self contained filtered, heated make up air fan similar (but smaller) that a restaurant uses. Ones such as supplied by Shelter Supply, and even Soler Palau would be ideal. These can be costly and large, but are definitely a hassle free way to go.

So now we have discussed the hidden parts, let’s get to the real hard part…”Exactly what is this going to look like in my dream kitchen?”

There are many ways to accomplish bringing air into the kitchen. Ideally, a grille in the wall behind the range would allow for proper mixing of contaminants with the fresh air before the ascent up the vent pipe. This would work best with filtered and heated air so as not to make the chef uncomfortable, but it could be any of the methods discussed earlier.

Something that is becoming increasingly popular is to put rectilinear grilles in the toekick of the cabinet to keep them out of sight as well as promote an up-welling flow of the air to ensure even airflow. This would likely be the easiest to accomplish if one were remodelling the kitchen versus new home construction.

An interesting option I discovered on the internet is to have the grille feeding air from a powered fan or passively to the kitchen hidden behind the refrigerator. This hides the grille nicely, and the coils of the refrigerator act as a small pre-heater to take the edge of the temperature. Quite ingenious I thought.

The last way would involve diffusers in the ceiling, fed by a fan or short length of duct work in the attic to provide for air when necessary. This is less than ideal in terms of where the air is entering, but will provide us with the air the kitchen fan will need.

In an ideal world, the Make Up Fan and kitchen fan would be of similar performance as we like to maintain a balanced situation. I have seen some standards which call for 2/3 or 3/4 of the airflow of the kitchen fan to be supplied as make up air. This of course relies upon the cracks of the house to make up the rest. Under most circumstances, this may be correct, but as homes get tighter and tighter I can’t see this ratio working for long. Even older homes are being retrofitted to be sealed more extensively for energy savings, so we can no longer assume the house will give up the air we need. A good plan would call for balanced airflow coming and going.

Lastly, you will want to have the Make Up Fan on a speed control as well, so you can adjust the amount of air coming in. No sense in bringing in 1000CFM if you are boiling water for tea with your range hood on low power. You could get a large capacity speed controller that will handle both fans at once, or have them on separate controls so you could choose when the Make Up Fan runs. There would be no need to run the Make Up Fan on a nice summer evening when you likely have doors and windows open.


Tagged with: