Get The Popcorn…

On July 29, 2010, in news, by jake
0

Todays high tech TV and sound systems have a lot of computing power and lots of amps to portray the sounds the Director wanted you to hear. A byproduct of all those components can be tremendous heat build up, which potentially could damage your equipment.

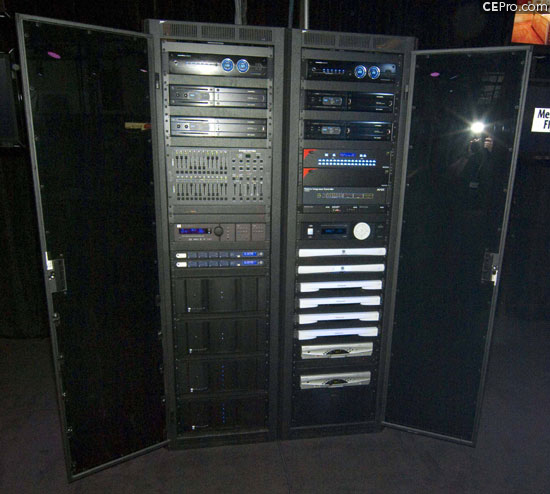
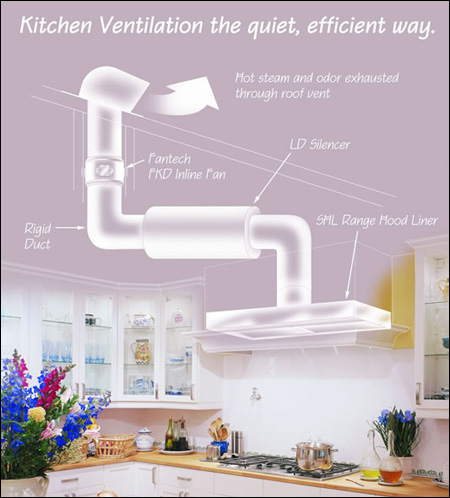
The best way to alleviate heat build up is of course to evacuate the air from the enclosure or room the equipment is in. Typically installers will install a thermostat in the room, then put a remote fan above or below connected with duct to pull air out.

S&P inline fans:
http://www.hvacquick.com/products/residential/AirFlow-Boosting/Inline-Air-Booster-Fans/SP-TD-Series-Inline-Fans

Of course we need cooler air to come in and replace what we have taken, so a popular solution is to install a grille down low in the access door. This allows air to come from the house and absorb the heat being produced. Sometimes we even add a filter to this door grille to keep the dust from building up on the components.

This will also work with servers, and other heat generating electronic equipment. Some benefits of proper heat dispersal is better performance and longer life of the pieces.

Tagged with:
 

Keep It Quiet…

On July 23, 2010, in news, by jake
0

A concern shown by many clients is quiet operation of whichever fan unit they are purchasing. Remote fans clearly will assist with this as the fan is not located directly above you. There are other factors that can help with a quiet installation.

For bath fans, try to get at least 5-8 feet of flexible insulated duct between the fan and grille. We have found this ducting does a great job at minimizing noise and vibration transmission.

Kitchens are bit tougher since any fan moving the volume of air that they do will be louder. Typically a Fantech Silencer will assist in this matter quite well. Distance will also be your friend on these as the fans can typically be mounted anywhere in the duct run. Also, try to get a couple bends in the pipe between the fan and the kitchen. This will help bounce the sound waves back to the discharge side, and help keep things quiet.

For those of you doing general ventilation, boosting your HVAC airflow and other tasks, you can use a combination of the above and use a couple of the following:

If you are trying to boost airflow at a particular register, try to keep the fan back from the register by a few feet if possible.

Those with rigid duct would do well to replace a section around the fan with flex duct to help absorb some noise.

The use of a speed controller can help quiet a fan as well. You can purchase a fan with a little more power than you need and dial it back to suit your need.


Under Pressure!

On July 22, 2010, in news, by jake
0

One of my favorite activation methods for remote duct booster fans is a pressure sensing switch. The pressure switch has a distinct advantage over hard wiring, since you do not have to pull new wires from the main fan unit to the remote mounted fan.  This saves you time and money on installation.

The pressure switch works by sensing the pressure increase in the duct from the central fan activating. The switch diaphragm is able to sense extremely small pressure increases (approximately 0.05″ – 0.07″) which then activates a single pole, single throw snap switch that starts the duct booster fan.

The pressure switch is connected by means of a pressure tap that is either a section of flexible tubing, such as used by the Fantech DB10, or a short direct barbed tap, as used by the Tjernlund PS1503, that can be inserted into the duct or plenum. In the case of very long duct runs, the tap should be placed “upstream” of an elbow in order to take advantage of the temporary pressure build up before the elbow due to the resistance of the bend. The switch can be conveniently installed near the booster fan localizing and limiting the amount of area disturbed by the upgrade.

Tjernlund Pressure Switch

All in all, the pressure switch is an easy and quick option when installing you duct booster fan.


Recommendations for bathroom ventilation sizing can vary considerably between manufacturers and competing standards.  Some of the newer recommendations allow for low ventilation rates over long periods of time as opposed to the typical 8 air changes per hour. 

We prefer 8 air changes per hour as A MINUMUM and here is why:
When moisture is introduced into the bathroom it has an annoying tendency to get diluted into the entire air content of the space.  With low CFM (background) ventilation that moisture will eventually be exhausted, but in the meantime it will linger in the air and potentially condense on colder objects such as walls and fixtures.  Once it’s in liquid form on your walls it takes A LONG TIME to evaporate it again, not to mention the potential long term damage to the bathroom.

So what do WE recommend?
– minimum of 8 air changes per hour (more is better since the extra CFM typically comes at very little cost; nothing wrong with 10 or 12 air changes per hour)
– 100 CFM minimum per bathroom, no matter how small it is
– multiple grilles in larger bathrooms to pickup the moisture/smells close to the source
– keep the system quiet (inline fans!!) so that you will use it
– install a timer and leave the fan running for at least 20 minutes after leaving the bathroom

And remember, the standards are there for the builders and not necessarily for you.  Keep the moisture off your walls with adequate CFM and you will avoid mold issues.

Tagged with:
 

Smoke And Grease Be Gone…

On July 14, 2010, in solutions, by jake
0

The Kitchen…a place of interest for those of us who like to eat.

Most of us are familiar with the noisy, rattling, ineffective range vents usually installed in a home. These units typically have some form of fan and motor right above the range, causing all sorts of racket, and struggle to pull all the smoke from the fish that my wife I burned last night.

Is there a better way? You bet. Fantech Component Kitchen Exhaust systems. These have the a powerful fan located in the attic, coupled with a Silencer (muffler for the automotively inclined) that is able to pull massive amounts of air and do it without driving you from the kitchen with noise.

The ideal setup would have some sort of Hood Liner, a Backdraft Damper to prevent air from coming down the pipe when the Fan is off, the Silencer, The Fan and some sort of discharge hood in that order. All that is left is some hard wall galvanized pipe and you have a vent system that is unparalleled in terms of performance and quiet operation.

Sizing the system can be done by using our handy System Builder or a few simple rules of thumb:

  • The hood should be wider than the range.
  • Multiply the size of the hood to get surface area (36×22=792sq in)
  • Divide that by 144 to get square footage (792 sq in=5.5 sq ft)
  • Use around 75-100 CFM per square foot minimum to get the size fan you need

Tagged with:
 

Radon awareness

On July 8, 2010, in did you know, by jake
0

What is Radon?
Radon is a cancer-causing natural radioactive gas that you can’t see, smell or taste. Its presence in your home can pose a danger to your family’s health. Radon is the leading cause of lung cancer among non-smokers. Radon is the second leading cause of lung cancer in America and claims about 20,000 lives annually. The areas affected across the United states are shown here on this map:

– Zone 1 counties have a predicted average indoor radon screening level greater than 4 pCi/L (pico curies per liter) (red zones)
– Zone 2 counties have a predicted average indoor radon screening level between 2 and 4 pCi/L (orange zones)
– Zone 3 counties have a predicted average indoor radon screening level less than 2 pCi/L (yellow zones)

 Consulting this map is only for broad reference. In order to determine the level of Radon in you home the most effective method available to the public is a liquid scintillation or other radon test kit:

http://www.hvacquick.com/products/residential/Fans/Radon-Fans/RadonAway-Radon-Test-Kits

This test is a simple first step towards peace of mind in protecting your family and yourself from the deleterious effects of Radon.

Tagged with:
 

In this industry, CFM ratings are the “horsepower”, so to speak, that people use to compare products.

This statistic is used to measure how much air a fan can actually move. Here is the tricky part…Static Pressure. This is the number you see, usually measured in inches of water column, on those charts that show CFM for a given fan. Fine, what is it then?

In a word, resistance. That is, how much duct does the fan have to push or pull through? How many bends in the run? These are factors that can increase the Static Pressure and decrease the performance of the fan.

When fan shopping, be sure to compare apples to apples as some Manufacturers provide CFM at 0″ SP, while others may show what the fan could do under more adverse conditions such as .2″ or more. Which is more likely how it will perform when installed.

Here is a sample chart to let you see how things can change…

Tagged with:
 

A Little About Air…

On July 8, 2010, in did you know, by jake
0

We believe that a well informed customer will always have a more gratifying experience. So in that regard, here is the 10 minute ‘expert’ course in airflow. What we won’t discuss for now are the human engineering aspects. Thermal comfort is a complex science.

What is CFM?

You see the numbers everywhere, what does it mean? CFM stands for cubic foot per minute. This term is used as a measurement of airflow rate for ventilation systems. The cubic foot refers to a cube of air 1 foot x 1 foot x 1 foot. CFM represents a volume flow rate, since we measure how many cubic feet are flowing by per minute.

Air is really, really light.

It takes 13.5 cubic feet (101 gallons) of air to weigh 1 pound. For a 2,000 square foot house, that means all the air in that house weighs 1,185 pounds – not much. Warming or cooling air is “low calorie”. To warm all that air in your house up from 50 degrees F to 70 degrees F takes about 5,688 BTU’s. The smallest house furnace puts out 40,000 BTU’s per hour. So how come it takes so long to heat up the house on a cold morning? (hint: you’re not just warming the air) An unsealed door jamb, leaking 50 CFM, would over the course of 24 hours, leak out 72,000 cubic feet of air – not “low calorie.”

Tagged with:
 

Hole in one.

On July 1, 2010, in technical-support, by radek
0

One of the most frequent calls we get is how to size/select our Dayus custom grilles.  The answer is simple:  The HOLE size.

The measurement we need to build a grille is the size of the hole/opening (we call it LIST SIZE).  The hole size is the information entered into our website for pricing and ordering.  Dayus will build the grille slightly undercut to make sure the recessed portion of the frame slides nicely into the hole. 

The grille flange is roughly 1″ all around, giving you a finished flange to flange dimension 1-11/16″ bigger than the hole size (list size) you gave us.

Dayus Bar Linear Grille

Dayus grilles:
http://www.hvacquick.com/products/residential/Grilles-Registers/Grilles

Tagged with: